You are here: Blog
Making Upcycled Paper Flowers
April
3

Written by: journeyoncanvas

04/03/2023 2:50 AM

Making upcycled paper flowers is an art form in and of itself. The process involves creating delicate and intricate flowers out of paper, using various techniques such as folding, cutting, and gluing. I like to use lifelike floral arrangements that I buy at the Salvation Army or estate sales to embellish my flowers and make them look more fanciful and artistic. The video, below, will show you my process and give you some ideas for creating your own floral creations. I like to create my own decorative flower making papers using a gelli plate. I create these papers from old magazines, books, and papers meant for the shredder. Using a gelli plate, acrylic paint, and stencils, I get wonderful results and get a unique arrangement while saving money on papers I might otherwise buy at the craft store. I also like to use my own papers and original materials as often as possible when creating my sculptures, so my work is one of a kind. If decorative paper making interests you, an internet search on “how to use a gelli plate” will get you started on making upcycled paper flowers with one-of-a-kind papers. Here are some suggestions for making paper flowers: Choose your paper: You can use any type of paper, such as tissue paper, crepe paper, or even scrapbooking paper, depending on the type of flower you want to make. Cut the paper into petals: Use a template or trace and cut petals freehand, making sure they are all the same size and shape. Fold the petals: Fold the petals in half or in thirds to create a more natural, realistic look. Curl the petals: Use a toothpick or your fingers to curl the edges of each petal, giving them a more lifelike appearance. Glue the petals together: Use a hot glue gun or white glue to attach the petals together, making sure to overlap them slightly. Add a stem: Use floral wire or a pipe cleaner to make a stem for your flower and attach it to the base of your flower with glue (I prefer hot glue). Finish the flower: Add any additional details, such as leaves, stamens, or centers, to complete the look of your flower. (This is when I like to incorporate any faux flower arrangements I have found in my travels. I can mix my paper flower creations with the stems and leaves of my faux arrangements. I mix and match. Sometimes, I even use a mix of faux flowers and my paper flower creations.) With practice and patience, you can create beautiful paper flowers. You can also add other elements when making upcycled paper flowers. For example, I painted butterflies and added them to my arrangements. If you have questions about my process, respond here at Journey on Canvas Blog. Creative process is a journey of discovery that we don’t need to travel alone. This blog can help inspire you and direct you as you discover and create beautiful things. Click here to read a book about the creative journey. Click here to learn more about the artist’s journey.  
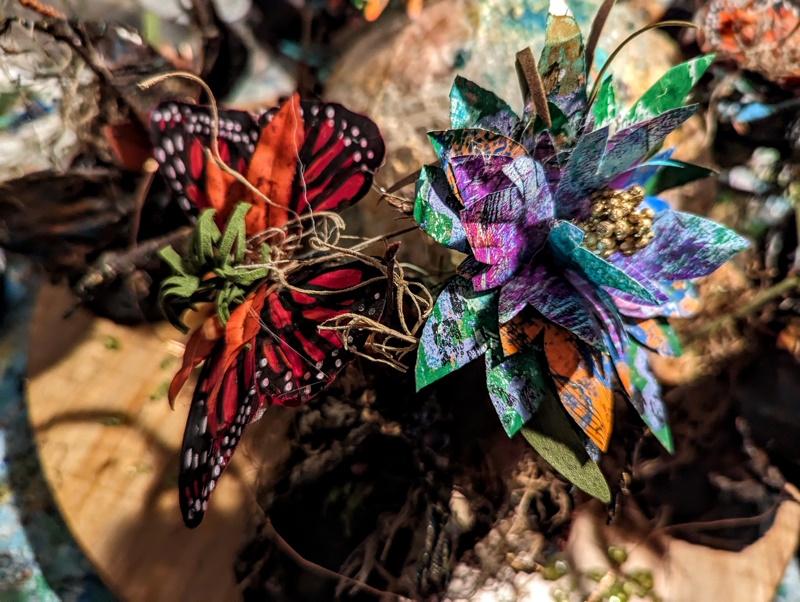
This is a photo of handmade, upcycled paper flowers with floral embellishments.
With practice and patience, you can create beautiful paper flowers. As shown in the picture above, you can use embellishments to make your flowers look more fanciful and artistic.

Making Upcycled Paper Flowers

Making upcycled paper flowers is an art form in and of itself. The process involves creating delicate and intricate flowers out of paper, using various techniques such as folding, cutting, and gluing. I like to use lifelike floral arrangements that I buy at the Salvation Army or estate sales to embellish my flowers and make them look more fanciful and artistic. The video, below, will show you my process and give you some ideas for creating your own floral creations. I like to create my own decorative flower making papers using a gelli plate. I create these papers from old magazines, books, and papers meant for the shredder. Using a gelli plate, acrylic paint, and stencils, I get wonderful results and get a unique arrangement while saving money on papers I might otherwise buy at the craft store. I also like to use my own papers and original materials as often as possible when creating my sculptures, so my work is one of a kind. If decorative paper making interests you, an internet search on “how to use a gelli plate” will get you started on making upcycled paper flowers with one-of-a-kind papers.

Here are some suggestions for making paper flowers:

Choose your paper: You can use any type of paper, such as tissue paper, crepe paper, or even scrapbooking paper, depending on the type of flower you want to make.

Cut the paper into petals: Use a template or trace and cut petals freehand, making sure they are all the same size and shape.

Fold the petals: Fold the petals in half or in thirds to create a more natural, realistic look.

Curl the petals: Use a toothpick or your fingers to curl the edges of each petal, giving them a more lifelike appearance.

Glue the petals together: Use a hot glue gun or white glue to attach the petals together, making sure to overlap them slightly.

Add a stem: Use floral wire or a pipe cleaner to make a stem for your flower and attach it to the base of your flower with glue (I prefer hot glue).

Finish the flower: Add any additional details, such as leaves, stamens, or centers, to complete the look of your flower. (This is when I like to incorporate any faux flower arrangements I have found in my travels. I can mix my paper flower creations with the stems and leaves of my faux arrangements. I mix and match. Sometimes, I even use a mix of faux flowers and my paper flower creations.)

With practice and patience, you can create beautiful paper flowers. You can also add other elements when making upcycled paper flowers. For example, I painted butterflies and added them to my arrangements. If you have questions about my process, respond here at Journey on Canvas Blog. Creative process is a journey of discovery that we don’t need to travel alone. This blog can help inspire you and direct you as you discover and create beautiful things.

Click here to read a book about the creative journey.

Click here to learn more about the artist’s journey.
 

Journey on Canvas Blog: A Place to Share Hope on Your Journey

Journey on Canvas is a spiritual autobiography and spiritual journaling site. The Journey on Canvas Blog will give you ideas for your spiritual journal and give you opportunities to share your spiritual story. This blog is also a place to find hope on your journey. Read, blog with me, and enjoy!

tears for dancing

Tears for Dancing, Age 42

The older I get the less I think about what I can get out of this life. Bad things happen here on Earth and no one is immune. I see my parents suffering, I watch terrible things happen to my friends and I see catastrophic events that create hell on Earth. Revelation 21:4 promises that someday God will wipe every tear from our eyes and the old order of things will pass away. I’m beginning to think that this promise isn’t so far away: it’s just waiting for us at the next stop. Maybe when we die we trade our tears for dancing and enter Heaven. Until then, I'm going to paint, I'm going to write, and I'm going to share when I find hope in this life. That's why I'm here at Journey on Canvas.